Testing with Desk
Desk can spin up a local Kubernetes cluster with skew protection pre-configured. This is the easiest way to try out versioned deployments before going to production.
The skew-protection profile installs Envoy Gateway as the Gateway API controller, creates a Gateway resource, and enables skew protection on ICC with shorter timeouts suited for testing.
Prerequisites
Section titled “Prerequisites”Follow the Getting Started guide to install Desk and configure your environment (GitHub OAuth, .env file, /etc/hosts).
Start the cluster
Section titled “Start the cluster”desk cluster up --profile skew-protectionThis creates a local k3d cluster with all the necessary components.
Verify that the Gateway is programmed:
kubectl get gateway platformatic -n platformaticThe PROGRAMMED column must be True.
Profile settings
Section titled “Profile settings”The skew-protection profile enables skew protection with testing-friendly defaults. These values can be customized by editing the profile file:
| Setting | Profile Default | Production Default | Description |
|---|---|---|---|
skew_protection.enable | true | false | Enables skew protection |
skew_protection.http_grace_period_ms | 30000 (30 sec) | 1800000 (30 min) | Grace period — version kept alive unconditionally |
skew_protection.http_max_alive_ms | 180000 (3 min) | 86400000 (24h) | Max alive — hard ceiling before force-expiration |
skew_protection.check_interval_ms | 10000 (10 sec) | 60000 (1 min) | How often ICC checks if draining versions can be expired |
skew_protection.traffic_window_ms | 60000 (1 min) | 300000 (5 min) | Prometheus query window for traffic measurement |
skew_protection.cookie_max_age | 43200 (12h) | 43200 (12h) | Browser cookie lifetime in seconds |
skew_protection.auto_cleanup | false | false | Whether to delete expired Deployments and Services |
Deploy version 1
Section titled “Deploy version 1”Use the --version flag to deploy a versioned application. Desk automatically sets the correct app.kubernetes.io/name and plt.dev/version labels:
desk deploy --dir ./my-app --version v1 --profile skew-protectionWait for the pod to be ready:
kubectl get pods -n platformatic -l app.kubernetes.io/name=my-appVerify that ICC created the HTTPRoute:
kubectl get httproute -n platformaticOpen your browser and navigate to https://svcs.gw.plt/my-app/. Use the browser’s developer tools (Network tab) to check that the response includes a Set-Cookie: __plt_dpl=v1; ... header. Your browser is now pinned to version 1.
Deploy version 2
Section titled “Deploy version 2”desk deploy --dir ./my-app --version v2 --profile skew-protectionWait for both pods to be running:
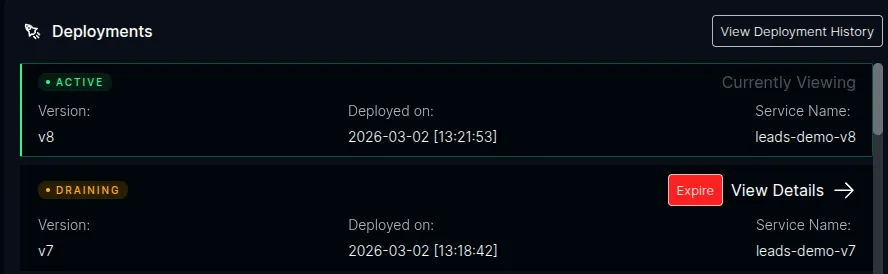
kubectl get pods -n platformatic -l app.kubernetes.io/name=my-appAfter ICC detects the new version, open the ICC dashboard at https://icc.plt/ and navigate to the Watt detail page for your application. The Deployments panel shows the version lifecycle in real time — the new version as Active and the previous version as Draining:
Verify routing
Section titled “Verify routing”Existing session — refresh the page in the same browser. Since the __plt_dpl=v1 cookie is still set, your requests continue to be routed to version 1. You can verify this in the developer tools — no new Set-Cookie header is returned.
New session — open a new incognito/private window and navigate to https://svcs.gw.plt/my-app/. This simulates a new visitor with no cookie. The response should include Set-Cookie: __plt_dpl=v2; ..., pinning this session to version 2.
Expiring a version
Section titled “Expiring a version”Draining versions are expired automatically when ICC detects zero traffic (after the grace period) or when the max-alive ceiling is reached. With the testing profile’s short timeouts (30-second grace period, 3-minute max alive), this happens fairly quickly.
For demos and testing, you can also expire a version immediately by clicking the Expire button next to the draining version in the ICC dashboard. This skips the grace period and triggers the cleanup right away — the HTTPRoute rules for that version are removed and the Deployment is scaled to 0 replicas.
After expiration, the dashboard shows the version as Expired:

Once expired, any browser still holding the old __plt_dpl=v1 cookie will be routed to version 2 on the next request, and a new Set-Cookie: __plt_dpl=v2 replaces the stale cookie.
Hostname routing
Section titled “Hostname routing”By default, Desk deploys apps under a path prefix on a shared hostname (https://svcs.gw.plt/<app-name>/). This works for most apps, but some frameworks — notably Next.js — make root-relative client-side fetch calls (e.g., fetch('/api/generate')) that break when the app is served under a sub-path.
The --hostname flag gives the app its own dedicated hostname with a root path prefix, matching how platforms like Vercel deploy apps:
desk deploy --dir ./my-app --version v1 --hostname my-app.plt --profile skew-protectionThis tells ICC to create an HTTPRoute with hostnames: ["my-app.plt"] and a / path prefix instead of hostnames: ["svcs.gw.plt"] with /<app-name>.
When to use --hostname
Section titled “When to use --hostname”| Scenario | Flag |
|---|---|
| App works fine under a sub-path | No flag needed (default path-prefix routing) |
| App makes root-relative API calls (e.g., Next.js) | --hostname my-app.plt |
| App expects to own its entire domain | --hostname my-app.plt |
/etc/hosts entry
Section titled “/etc/hosts entry”Add the hostname to your /etc/hosts file so it resolves to the local cluster:
echo "127.0.0.1 my-app.plt" | sudo tee -a /etc/hostsExample: versioned deploy with hostname
Section titled “Example: versioned deploy with hostname”# Deploy v1desk deploy --dir ./birthday-card-generator \ --profile skew-protection \ --version v1 \ --hostname birthday-card-generator.plt
# Deploy v2desk deploy --dir ./birthday-card-generator \ --profile skew-protection \ --version v2 \ --hostname birthday-card-generator.plt
# App is available at https://birthday-card-generator.plt/# API routes like /api/generate work correctlySkew protection works the same way — new visitors get pinned to v2 via the __plt_dpl cookie, while existing sessions on v1 continue to be routed there until the version is expired.
Testing workflows
Section titled “Testing workflows”The skew-protection profile also enables the Workflow Service, so you can test versioned workflow deployments alongside HTTP skew protection.
Deploy a workflow app
Section titled “Deploy a workflow app”Workflow apps need the WORKFLOW_TARGET_WORLD environment variable in their Dockerfile. Desk auto-detects this and sets the plt.dev/workflow: "true" label automatically:
desk deploy --dir ./my-workflow-app \ --version v1 \ --hostname my-workflow-app.plt \ --profile skew-protectionAdd the hostname to /etc/hosts:
echo "127.0.0.1 my-workflow-app.plt" | sudo tee -a /etc/hostsTrigger a workflow
Section titled “Trigger a workflow”Open https://my-workflow-app.plt/ and trigger a workflow through your app’s UI or API. In the ICC dashboard at https://icc.plt/, navigate to your Watt’s detail page — the Workflows tab shows runs in real time with status, version, and duration.
Version-safe deployments
Section titled “Version-safe deployments”Deploy a new version while a workflow is running:
desk deploy --dir ./my-workflow-app \ --version v2 \ --hostname my-workflow-app.plt \ --profile skew-protectionThe in-flight run on v1 continues executing on v1 pods. Queue messages are routed by deployment version — v1 messages go to v1 pods, v2 messages go to v2 pods. You can verify this in the ICC dashboard:
- Open the Watt detail page — the Deployments panel shows v2 as Active and v1 as Draining
- Open the Workflows tab — the running v1 run still shows
Version: v1and continues to completion - Start a new workflow — it runs on v2
ICC only expires the v1 version when the Workflow Service confirms there are no active runs, pending hooks, waiting sleeps, or queued messages for v1.
Replay on a draining version
Section titled “Replay on a draining version”You can replay a completed workflow even while its version is draining. In the run detail view, click Replay — the new run targets the original deployment version (v1), not the latest. This proves that draining versions remain fully functional for workflow traffic.
Inspect a run
Section titled “Inspect a run”Click any run in the Workflows tab to see:
- Trace — waterfall of every step with timing bars and parallel execution
- Graph — directed graph of the workflow structure
- Events — raw event log with expandable payloads
- Hooks — registered hooks/webhooks with status
- Streams — data written via
getWritable()
See the Workflows UI documentation for details.
Clean up
Section titled “Clean up”desk cluster down --profile skew-protection